No products in the cart.
- October 24, 2024
- Highlighter
The Ultimate Guide to Contouring and Highlighting for Beginners

Contouring and highlighting can seem intimidating for beginners, but with the right products and techniques, it’s easier than you think. Whether you want to sculpt your face or enhance your natural features, contouring and highlighting can make a huge difference in your makeup routine. At Makeup Studio Pro, we’re here to break down these steps to help you achieve that perfectly defined look. This guide will walk you through everything you need to know to master contouring and highlighting like a pro!
1. What is Contouring and Highlighting?
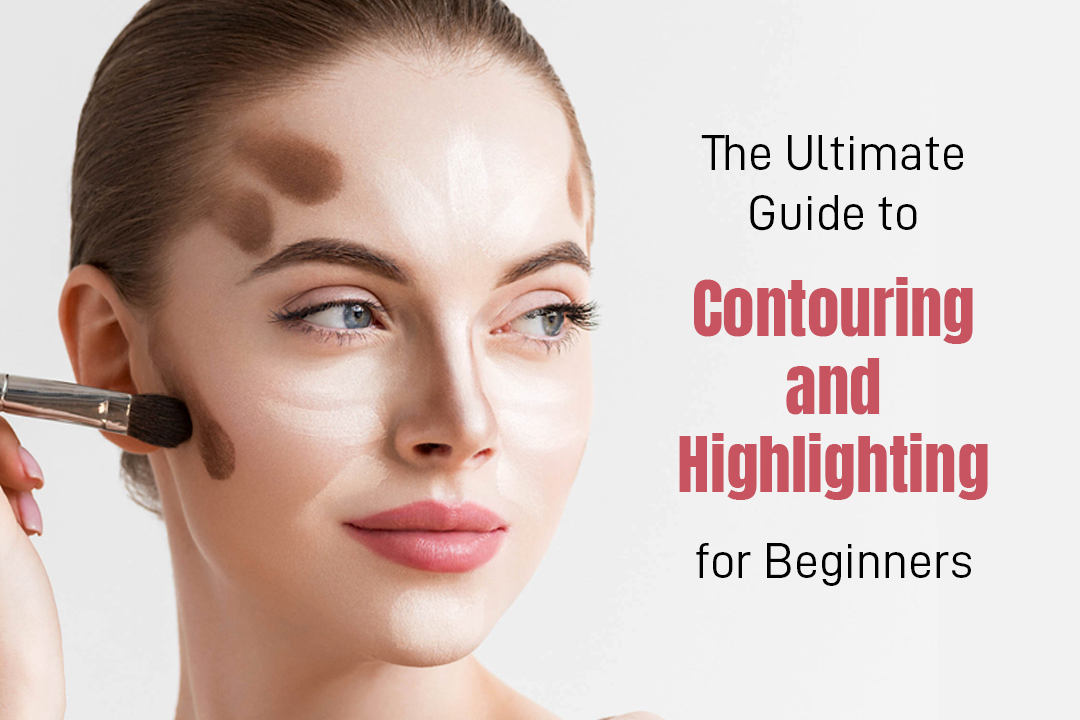
Contouring is the technique of using darker shades to create shadows on certain areas of your face, which helps define and sculpt your features. On the other hand, highlighting involves applying lighter shades to the high points of your face to bring them forward, adding dimension and glow.
Key Benefits:
– Contouring: Enhances and defines facial features such as cheekbones, jawline, and nose.
– Highlighting: Brightens the complexion and accentuates the high points of the face.
“Contouring helps me achieve a defined look while highlighting adds that perfect glow. The two work together to give my face structure.”
2. Choosing the Right Products
To get started, you’ll need the right products that complement your skin tone and are easy to blend. Here’s what you’ll need:
Contour:
– Choose a matte contour product from the Makeup Studio Pro Shaping Box Face It, in a shade 1-2 tones darker than your natural skin tone. Look for cool-toned shades to create realistic shadows.
Highlight:
– For highlighting, pick a highlighter that’s 1-2 shades lighter than your skin tone. Our Makeup Studio Pro Lumiere Highlighting Powder offers a variety of shades for different skin tones, giving you that lit-from-within glow making it the best face highlighter in india.
3. The Step-by-Step Process
Let’s break down contouring and highlighting into simple steps:
Step 1: Start with a Clean, Prepped Face
Make sure your skin is cleansed, moisturized, and prepped with a primer to ensure your contour and highlight products apply smoothly and last throughout the day.
Step 2: Apply Foundation as Your Base
Before you start contouring, apply your foundation to create an even skin tone. This gives you a clean base to work on. Remember not to overdo it—your contouring will provide extra coverage and dimension.
Step 3: Contour the Key Areas
Using your contour stick or powder, apply product to the following areas:
– Cheekbones: Apply contour right below the cheekbones to sculpt and define.
– Jawline: Contour along the jawline to sharpen it and make your face appear more structured.
– Forehead: If you want to reduce the appearance of a larger forehead, apply contour along the hairline.
– Nose: For a slimmer nose, apply contour on the sides of your nose.
Tip: Blend using a contour brush or makeup sponge, working the product upwards to keep it natural and avoid harsh lines.
Step 4: Highlight the High Points
With a face highlighter or lighter concealer, apply to the high points of your face, where light naturally hits:
– Cheekbones: Right above your contour to enhance the lift of your cheekbones.
– Bridge of Nose: A thin line down the center of your nose will make it appear straighter and more defined.
– Forehead and Chin: A small amount on the center of your forehead and chin will bring light to these areas.
– Brow Bone and Cupid’s Bow: Highlighting just under your brow bone and the center of your upper lip will add a subtle pop of brightness.
Tip: Use a damp sponge or a soft brush to blend your highlight seamlessly into your foundation for a glowing finish.
4. Blend, Blend, Blend!
Blending is the key to natural-looking contour and highlight. Use a damp beauty blender or soft, angled brush to blend the contour into your foundation, ensuring there are no harsh lines. Make sure your highlighter is blended well into your skin for a soft, radiant glow.
_”Blending is what makes or breaks your contour. I always spend extra time blending to make sure my makeup looks seamless.”
5. Set Your Look
Once you’ve applied and blend your contour and highlight, set your makeup with a setting powder to lock everything in place. For a matte finish, try the Makeup Studio Pro Translucent Powder Extra Fine, or for a luminous finish, opt for a setting spray that adds a soft glow.
6. Pro Tips for Flawless Contouring and Highlighting
– Choose the Right Brushes: Use a dense brush for contouring and a fluffy brush for highlighting to ensure even application.
– Less is More: Start with a small amount of product and build up as needed. It’s easier to add than to take away!
– Lighting Matters: Always check your makeup in natural light to make sure your contour and highlights are blended and look natural.
Sculpt and Glow with Confidence
With the right products and techniques, contouring and highlighting can be easy and fun! Moira’s collection of contouring and highlighting products is designed to help beginners and pros alike achieve a sculpted, glowing look effortlessly. So grab your brushes and give it a try—you’ll be amazed at the transformation!
Discover Moira’s contouring and highlighting essentials today, and get ready to bring out your inner makeup artist!


